Concrete Fence Installation
Written by Dennis Kleinman
Why is the Stonetree® process the most labor-efficient concrete fence installation method in the industry?
StoneTree® Concrete Fence Wall Installation Process
Step 1: Initial Consultation:
The licensed StoneTree® Manufacturer visits the fence installation site to determine property lines, fence placement, gate or opening locations, and any other details pertinent to the project, such as location of lighting and security features, then compiles all the measurements and other information for the casting facility, where the wall sections are then manufactured.
Step 2: Footings Are Located,
Drilled Set to Grade and Poured
While the panels are being precast, a construction crew mobilizes on the jobsite to install the concrete fence. They locate where the footings are to be set, then an auger is used to drill the holes every 15′ on center for the footings. The footing forms are accurately laid out and set to grade with the structural supports clamped in the forms and then they are filled with concrete.

Step 3: Wall Sections are Installed
Once the footings have cured with the extended structural support, it is time to install the wall sections.

The wall sections http://www.cialisgeneriquefr24.com/tadalafil-et-hypertension/ are removed from the delivery truck
with the appropriate piece of equipment.

Each wall section is then transported to the fence line.

The wall is set in place by putting the column area
over the protruding steel support.
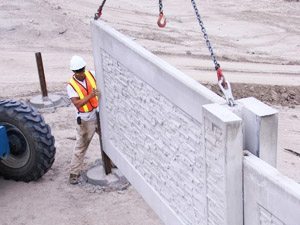
The wall is then aligned in place with the panel end
meeting the next structural support beam.

Once aligned and set to level, the rigging is removed.

To complete the installation, a concrete cap is secured to the top of each column
Step 4: Coloring
Once the wall is constructed, it is colored using a variety of techniques


